Silent Hill f puzzle guide
This Silent Hill f puzzle walkthrough distills every major puzzle into clear reasoning plus exact solutions for Story, Hard, and Lost in the Fog. The goal is to keep the Silent Hill f puzzle experience tense but fair: scan the spoiler‑light hint first, then unfold the confirmed solution only when needed. 🧩
If you searched for a Silent Hill f puzzle resource that balances clarity and brevity, this Silent Hill f puzzle guide is exactly that. Each Silent Hill f puzzle is presented with a short hint, a clean solution, and optional logic notes so you can learn without losing tension.
Silent Hill f puzzle FAQ
- What is a Silent Hill f puzzle? A Silent Hill f puzzle is any required logic gate that controls story progression. Treat every Silent Hill f puzzle as a checkpoint where reading the environment beats brute force.
- How do I approach a Silent Hill f puzzle on Hard? For any Silent Hill f puzzle on higher difficulty, start with the hint, map symbols to rules, then apply a confident sequence. The Silent Hill f puzzle layout always telegraphs a safe order.
- Is there a spoiler‑light Silent Hill f puzzle method? Yes. Use the hint first and only reveal the solution if stuck. This preserves the discovery that makes a Silent Hill f puzzle satisfying.
- Dark Shrine Path — Altar
- Dark Shrine Path — Shrine Vault
- Ebisugaoka Fields — Field Scarecrows
- Ebisugaoka Middle School — Stairwell Key
- Ebisugaoka Middle School — Secret Box
- Ebisugaoka Middle School — Locker Code
- Worship Hall — Door
- Worship Hall — Light
- Worship Hall — Memories
- Shimizu Residence — Scales
- Shimizu Residence — Ominous Photo
- Shimizu Residence — My Room
- Dark Shrine Rooms — Mural

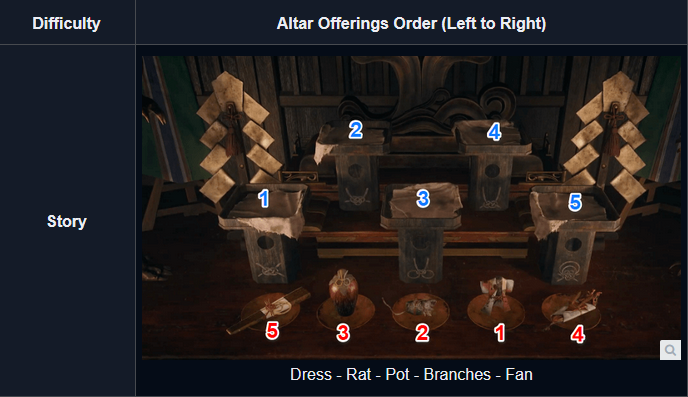
Dark Shrine Path — Altar puzzle
Hint: the Silent Hill f puzzle here anchors its logic on what the pedestal or offerings imply. Story references the pedestal’s bottom symbol and matching knots; Hard maps the offering patterns to an order; Lost in the Fog uses a riddle that dictates full placement sequence.
Solution summary: for Story/Hard, inspect pedestal/symbols or offerings and set the items to the matching order; for Lost in the Fog, read the riddle carefully and arrange all offerings in that narrative order. Confirm by subtle audio/visual cues. ✨


Dark Shrine Path — Shrine Vault
Hint: collect three Ema boards first. They provide the Combination Lock Dialand the symbols you must input. The Silent Hill f puzzle journal records the exact glyphs once you’ve found the right Ema set.
Solution: gather all 3 Ema, check the Journal, then input the symbol trio on the door’s dial from top to bottom. Move quietly; a patrolling creature reacts to noise.

Ebisugaoka Fields — Field scarecrow puzzle
Hint: remove flashcards from the correct scarecrows (they resemble Hinako and friends). Each pull makes a scarecrow point to the next row; follow the pointing direction to advance.
- Story: scarecrows resemble Hinako.
- Hard: scarecrows resemble Rinko.
- Lost in the Fog: first two resemble Sakuko, then Rinko; last three resemble Hinako.

Ebisugaoka Middle School — Stairwell key
Story: the 2F key sits in a locked faculty‑room drawer; fetch a hairpin from the garden shed to open it. Hard: the 2F key is in a flowerbed in the courtyard — head outdoors and retrieve it.

Ebisugaoka Middle School — Secret Box
This Silent Hill f puzzle takes clues from Rinko’s letters. You’ll match symbols in three rounds themed around: sweet vs tart fruit, journal/notebooks, and sakura in full bloom. Work from the clearest pairings first, then confirm on the box.


Ebisugaoka Middle School — Locker code
Target Asakura Ayumi’s locker to obtain the cabinet key for the faculty room. Codes vary by difficulty: Story 534, Hard 865, Lost in the Fog 399. Other lockers are optional but reward useful items (extra bag space, Omamori, origami).


Worship Hall — Door puzzle
Activate fox statues to open the blocked paths in the Worship Hall. Navigate toward the central axis; progression culminates in the hall where Sakuko appears.

Worship Hall — Light puzzle
Directional legend: W = West, E = East. The fox and rabbit statue directions control the height of the hanging cages. Adjust their facing to level platforms, collect both lampshades, then claim the altar key.


Worship Hall — Memories pedestal
Place Shu’s prized possessions. Story requires the Brainiac Hero Comic; Hard adds the Drawing of a Young Shimizu Hinako. These items are inside Dark Shrine rooms.


Shimizu Residence — Scales
The doll arrangement reflects your ending path. For the first ending, separate the Headless Doll from the other four. For the bad ending, place the Headless Doll with the Half‑Mask Lady Doll on one side, the remaining three on the other.


Shimizu Residence — Ominous Photo
Orientation also depends on the ending. Inspect the group photo and rotate upside down those whose faces are blurred. You must first find Hinako’s portrait in Shimizu Residence II for completion.


Shimizu Residence — My Room
Plate placement differs by ending route, but crest locations remain fixed regardless of Silent Hill f puzzle difficulty. Revisit each house version to gather all crests.


Dark Shrine Rooms — Mural
The mural puzzle’s journal notes change with the ending you’re pushing toward, yet crest identities and their slots do not. Clear each guardian encounter to access the crest boxes, then seat the trio per mural cues.


What counts as a puzzle in Silent Hill f?
Puzzles are not side content. Every Silent Hill f puzzle gates story flow — they’re progression checkpoints whose friction scales with your chosen difficulty. Read the environment first; the series rewards inference over trial and error. ��
For quick reference, bookmark this Silent Hill f puzzle guide. When you hit a tricky Silent Hill f puzzle, scan the spoiler‑light hint first, then reveal the solution to confirm your logic. This way each Silent Hill f puzzle stays tense, fair, and fast to resolve.
Keyword focus: Silent Hill f puzzle.